Section titled Command handlingCommand handling
Unless your bot project is small, it's not a very good idea to have a single file with a giant if/else if chain for commands. If you want to implement features into your bot and make your development process a lot less painful, you'll want to implement a command handler. Let's get started on that!
For fully functional slash commands, there are three important pieces of code that need to be written. They are:
- The individual command files, containing their definitions and functionality.
- The command handler, which dynamically reads the files and executes the commands.
- The command deployment script, to register your slash commands with Discord so they appear in the interface.
These steps can be done in any order, but all are required before the commands are fully functional.
This page details how to complete Step 2. Make sure to also complete the other pages linked above!
Section titled Loading command filesLoading command files
Now that your command files have been created, your bot needs to load these files on startup.
In your index.js file, make these additions to the base template:
- The
fsmodule is Node's native file system module.readdiris used to read thecommandsdirectory and identify our command files. - Thepathmodule is Node's native path utility module.joinhelps construct paths to access files and directories. One of the advantages ofpath.joinis that it automatically detects the operating system and uses the appropriate joiners. - Theurlmodule provides utilities for URL resolution and parsing.fileURLToPathensuring a cross-platform valid absolute path string. - The
Collection class extends JavaScript's native
Mapclass, and includes more extensive, useful functionality.Collectionis used to store and efficiently retrieve commands for execution.
Next, using the modules imported above, dynamically retrieve your command files with a few more additions to the index.js file:
First, url.fileURLToPath() helps to construct a path to the commands directory. The fs.readdir() method then reads the path to the directory and returns a Promise which resolves to an array of all the file names it contains, currently ['ping.js', 'server.js', 'user.js']. To ensure only command files get processed, Array.filter() removes any non-JavaScript files from the array.
With the correct files identified, the last step is to loop over the array and dynamically set each command into the commands Collection. For each file being loaded, check that it has at least the data and execute properties. This helps to prevent errors resulting from loading empty, unfinished or otherwise incorrect command files while you're still developing.
Section titled Receiving command interactionsReceiving command interactions
Every slash command is an interaction, so to respond to a command, you need to create a listener for the Client#interactionCreate event that will execute code when your application receives an interaction. Place the code below in the index.js file you created earlier.
_10client.on(Events.InteractionCreate, (interaction) => {_10 console.log(interaction);_10});
Not every interaction is a slash command (e.g. MessageComponent interactions). Make sure to only handle slash commands in this function by making use of the BaseInteraction#isChatInputCommand() method to exit the handler if another type is encountered. This method also provides type guarding for TypeScript users, narrowing the type from BaseInteraction to ChatInputCommandInteraction.
_10client.on(Events.InteractionCreate, (interaction) => {_10 if (!interaction.isChatInputCommand()) return;_10 console.log(interaction);_10});
Section titled Executing commandsExecuting commands
When your bot receives a Client#interactionCreate event, the interaction object contains all the information you need to dynamically retrieve and execute your commands!
Let's take a look at the ping command again. Note the execute() function that will reply to the interaction with "Pong!".
_10export const data = {_10 name: 'ping',_10 description: 'Replies with Pong!',_10};_10_10export async function execute(interaction) {_10 await interaction.reply('Pong!');_10}
First, you need to get the matching command from the commands Collection based on the interaction.commandName. If no matching command is found, log an error to the console and ignore the event.
With the right command identified, all that's left to do is call the command's .execute() method and pass in the interaction variable as its argument. Note that the event listener has been made async, allowing Promises to be awaited. In case something goes wrong and the Promise rejects, catch and log any error to the console.
_21client.on(Events.InteractionCreate, async (interaction) => {_21 if (!interaction.isChatInputCommand()) return;_21_21 const command = commands.get(interaction.commandName);_21_21 if (!command) {_21 console.error(`No command matching ${interaction.commandName} was found.`);_21 return;_21 }_21_21 try {_21 await command.execute(interaction);_21 } catch (error) {_21 console.error(error);_21 if (interaction.replied || interaction.deferred) {_21 await interaction.followUp({ content: 'There was an error while executing this command!', ephemeral: true });_21 } else {_21 await interaction.reply({ content: 'There was an error while executing this command!', ephemeral: true });_21 }_21 }_21});
Section titled Command categoriesCommand categories
So far, all of your command files are in a single commands folder. This is fine at first, but as your project grows, the number of files in the commands folder will too. Keeping track of that many files can be a little tough. To make this a little easier, you can categorize your commands and put them in subfolders inside the commands folder. You will have to make a few changes to your existing code in index.js for this to work out.
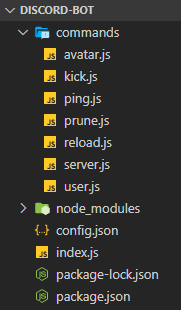
If you've been following along, your project structure should look something like this:
After moving your commands into subfolders, it will look something like this:
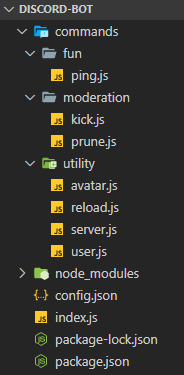
Make sure you put every command file you have inside one of the new subfolders. Leaving a command file directly under
the commands folder will create problems.
It is not necessary to name your subfolders exactly like we have named them here. You can create any number of subfolders and name them whatever you want. Although, it is a good practice to name them according to the type of commands stored inside them.
Back in your index.js file, where the code to dynamically read command files is, use the same pattern to read the subfolder directories, and then require each command inside them.
That's it! When creating new files for commands, make sure you create them inside one of the subfolders (or a new one) in the commands folder.
Section titled Next stepsNext steps
Your command files are now loaded into your bot, and the event listener is prepared and ready to respond. In the next section, we cover the final step - a command deployment script you'll need to register your commands so they appear in the Discord client.
Section titled Resulting codeResulting code
It also includes some bonus commands!